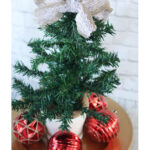
Christmas Tree Table Centerpiece
This Christmas Tree Table Centerpiece is incredibly versatile. It’s very easy, looks elegant, can be customized to fit your own decor and can go just about anywhere you want it in your home.
Yield: 1 centerpiece
Cost: $5-$10
Equipment
- Hot Glue
- Hot Glue Gun
- [scissors]
Materials
- 1 18 " Dollar Store Christmas Tree Green
- 1 3.5 " Roman Urn Glass Candleholder
- 1 Roll Burlap Ribbon
- 1 roll Floral Garden Lacy Burlap Ribbon
- 1 roll jute twine
- Gold Plastic Charger Plate with Beaded Trip
- Rust-oleum Flat White Spray Paint
- Strong Adhesive
- 1 Foral Foam Block
Instructions
- Start by spray painting your glass candle holder. I did two coats and allowed to dry in between coats about 2-3 hours. Then allowed to dry overnight.
- Open the Christmas tree, discard the plastic stand pieces and spread the branches out. I used a piece of floral foam, cut down to size, to insert the base of the tree to keep it standing while working with it, as well as to secure it into the candle holder at the end. Secure the tree into the piece of foam and add some glue to keep it sturdy.
- Cut a large piece of floral Garden Lacy Burlap Ribbon according to the bow style you'd like for the top of the tree. Create the bow to your liking and carefully but securely glue it to the top of the tree. Allow to dry according to glue directions. I did all of this the first day so the main part of paint and glue could dry overnight.
- Once the candle holder is dry, cut a long piece of jute twine and secure it it around the base of the candle holder in a decorative fashion. Feel free to keep winding, or overlap or make it the way you want it. Use glue to secure it in place and allow to dry.
- Add glue to the bottom and sides of the floral foam and glue the tree and foam into the candle holder. Allow to dry.
- Once everything is completely dry, insert a long strip of burlap ribbon winding it around the base of the tree, allow it to show coming out of the candle holder.
- Decorate tree according to your tastes.
- Display on a large Gold Plastic Charger plate on the table surrounded in ornaments.